Utah National Parks: 7 Day Road Trip Itinerary

Overview
Time of year visited: Fall, mid-October
Number of days on the road: 1 week - 7 days
Impressions: Otherworldly, vivid colors, vast landscapes
Utah had been on our list for many years, so we were super excited that we finally got to see this part of the country. And I don’t know about you, but we have a tendency to over plan and stuff as many trails and stops into our trips as possible – so it was tempting to try to fit in all 5 Utah National Parks. As we were planning though, we decided to leave Arches and Canyonlands for another time and focus this trip on Zion, Bryce, and Capitol Reef (and even that was ambitious!).
Highlights
Hiking Angels Landing
Catching the sunrise at Bryce Canyon
Driving along UT-12 from Escalante to Capitol Reef
Don’t forget!
Packing
Moisturizer - the climate is dry folks
Layers - the temperature swings quite a bit, and being in the shade vs. sun makes a big difference (We love our Arc'teryx Atom Hoodys Mens / Womens. They’re super packable, warm, and come in a variety of colors)
Planning
Apply for trail permits by the deadlines (or get lucky with the day before lottery)
Book popular campgrounds as soon as they open bookings
Download offline Google maps (and Spotify playlists for your road trip!)
Adventuring
If you try your hand at dispersed camping, make sure you visit a dump station and have enough clean water for the night
Watch the weather - flash floods are dangerous
Leave no trace, as always

Day-by-day Recap
Day 1
〰️
Day 1 〰️
Day 1 Utah National Parks Itinerary:
Vegas to Zion
Campervan pickup
We flew into Las Vegas the night before beginning our journey north and picked up our campervan from Travellers Autobarn the next morning. The process was smooth, with friendly staff making it easy, and we even grabbed a few essentials from the “free pile” they offered.
Groceries
Before hitting the road, we stocked up on supplies at Costco and Walmart. Our Costco membership, which we’ve had for a couple of years, has been a game-changer for camping trips. It allows us to easily grab bulk essentials (hiking snacks, drinks, produce, rice packets, etc.) and then we fill in the gaps with a stop at Walmart, making sure we have everything we need for the week.
Getting to the Parks
We set out for Zion as our first stop, a 2 hour and 40 minute drive from Las Vegas. Just before sunset, we pulled into Watchman Campground and were greeted by a mother deer and her fawn wandering around our campsite. After a quick trip back into town for some rum and coke supplies, we settled in for the night with a cozy campfire and dinner under the stars.


Where to stay in Zion: Watchmen Campground
We stayed at Site D021, which offered incredible views for just $20/night. Be sure to book early—reservations open six months in advance, so set a reminder to snag your spot as soon as possible. The campground is conveniently located near the visitor center, making it easy to catch the shuttle that runs every 10–15 minutes. For this park, we didn’t have any backups since we secured our reservation well ahead of time.
Day 2
〰️
Day 2 〰️
Day 2 Utah National Parks Itinerary:
Exploring Zion


Angels Landing
Our day began with a ride on the Zion Canyon shuttle from the Visitor Center (stop 1) around 10:10am, reaching The Grotto (stop 6) by 10:30am. The sun was just beginning to light up the rocks, making for a gorgeous, golden-hued backdrop. We hiked a total of 4.3 miles, taking about 3.5 hours with snack breaks and plenty of photo stops along the way. Be ready for some switchbacks as you climb, but the views at each turn make it more than worthwhile.
There was a quiet slot section near the top, offering a break from other hikers and shade from the sun. We reached the trail's permitted entry point at 11:20am and were pleased to find no lines. It’s easy to see why this trail is such a favorite (and why they implemented the permitting program). With steep drops on either side, chains to grip for safety, and dramatic rock formations surrounding you, the entire hike feels both thrilling and awe-inspiring. The earlier start to our day helped us beat the crowds, making the experience even more memorable.
Although we skipped the Grotto Trail to the West Rim this time in favor of seeing other sights, it came highly recommended for those with extra time. There are bathrooms at the summit, though fair warning: the smell can be quite strong! We finished our hike around 1:50pm, and definitely noticed a steady increase in foot traffic on the return trip.
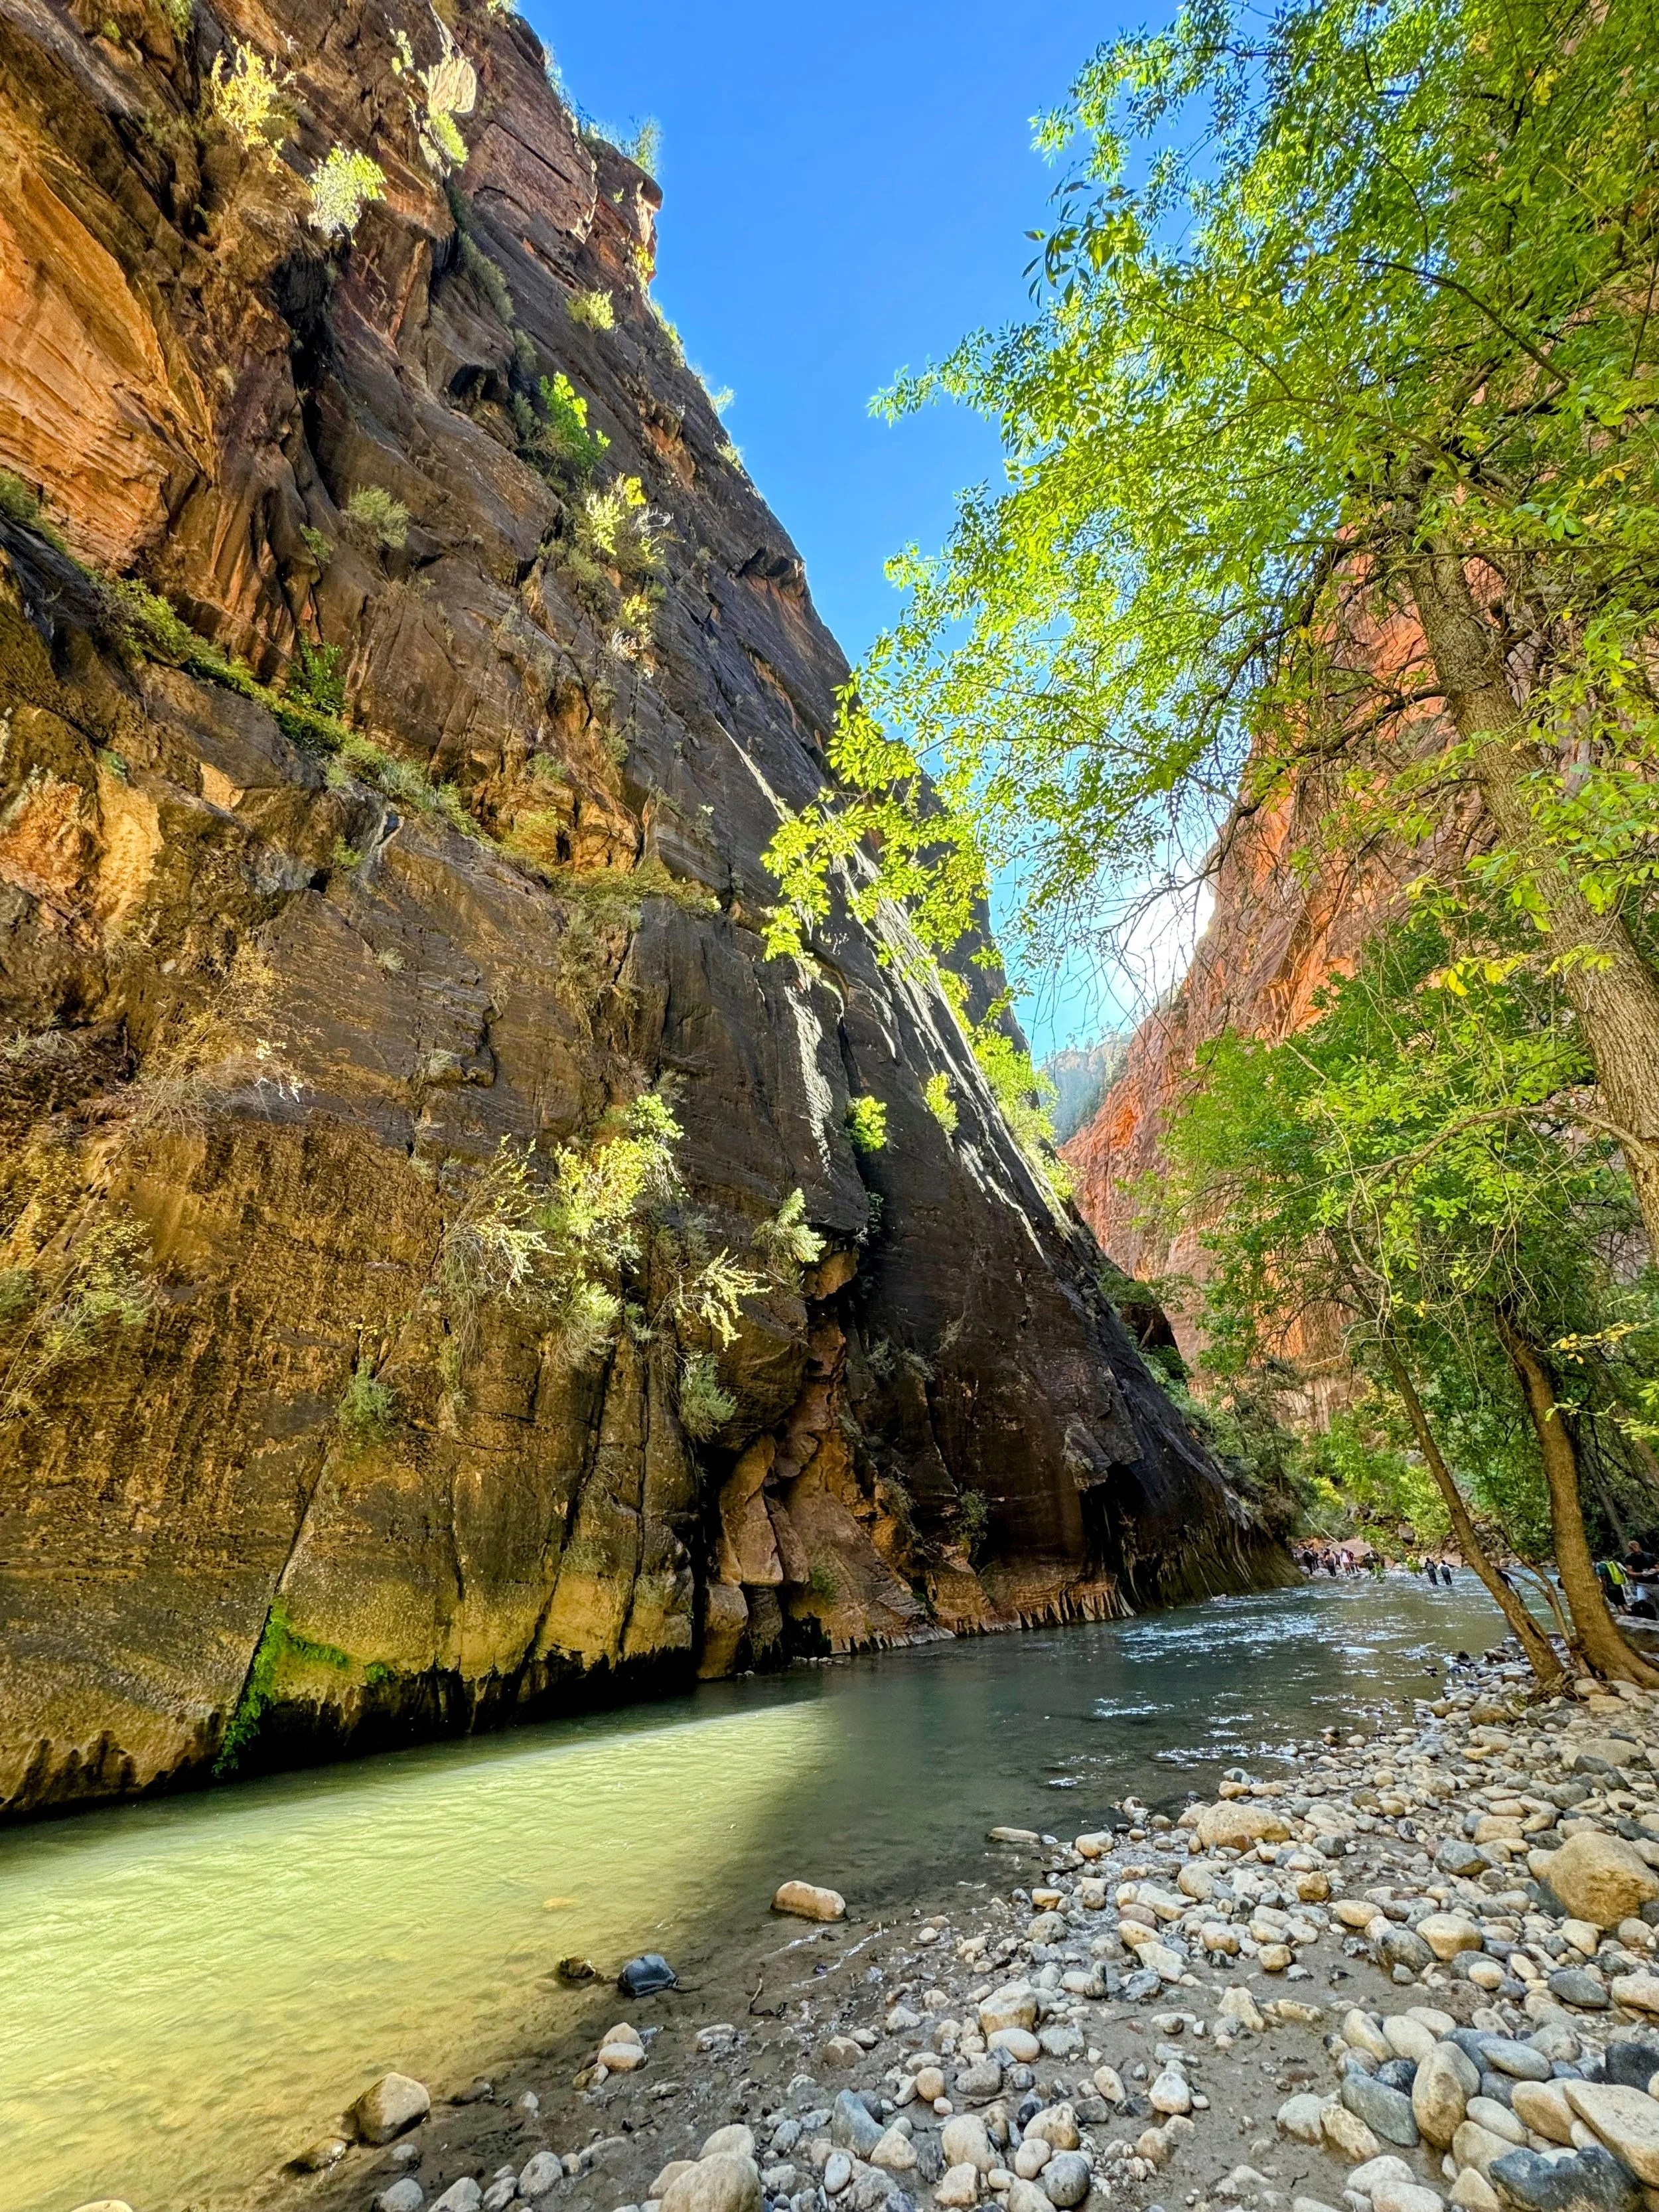


The Narrows Riverside Walk
We hopped back on the Zion shuttle and made our way to the Temple of Sinawava (stop 9) around 2:30pm for a quick adventure into the iconic Narrows. The hike was about 1.9 miles roundtrip and took us roughly 1.5 hours (but if you’re just planning to do the Riverside Walk, an hour will do).
We reached the end of the Riverside Walk by 3pm, then continued about 15–20 minutes into the canyon itself. It didn’t take long to realize we were a bit underprepared for the cold water, as nearly everyone else had full overall wetsuits and boots. Still, we powered through in our Chacos for a while (the stinging in your feet does eventually fade!), but once we hit chest-deep water, we decided to turn around. We made it back to the shuttle stop around 4 pm, a bit chilled but happy we’d gotten a taste of the Narrows.


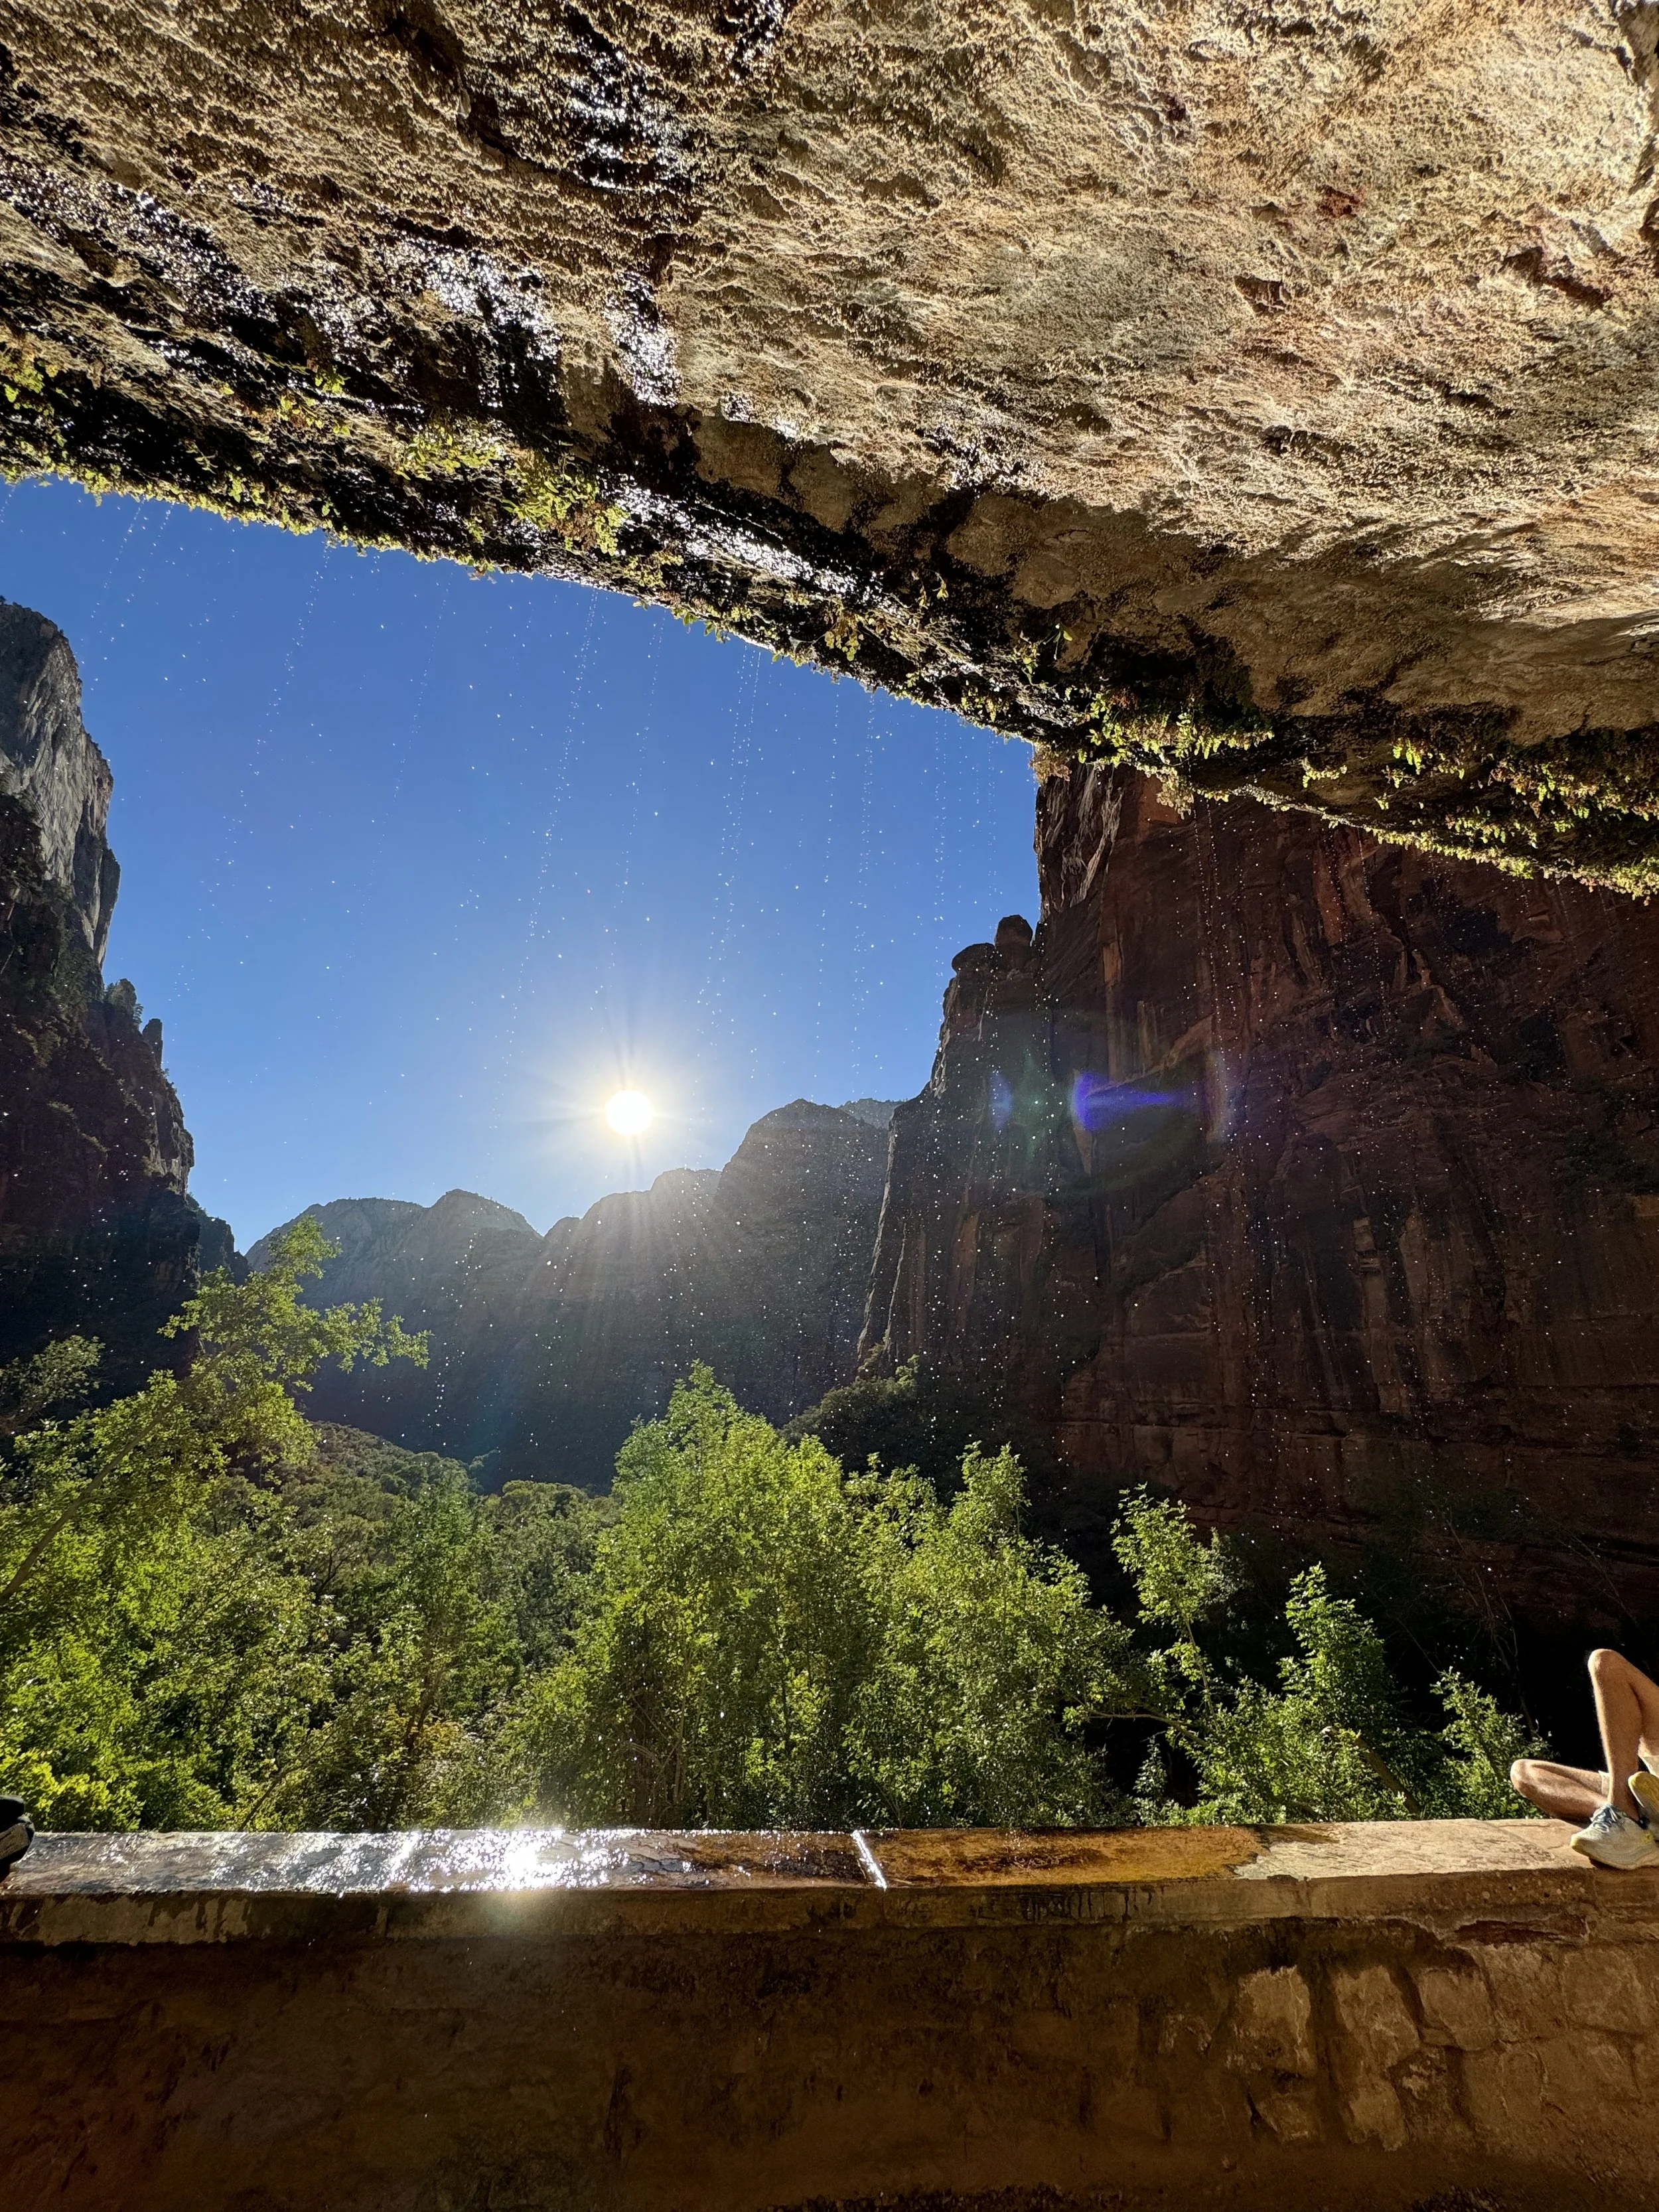
Snack Break at Weeping Rock
After braving the icy waters of the Narrows, we made a quick stop at Weeping Rock (stop 7). The shuttle stop offered a peaceful spot along the Virgin River to enjoy some lunch and soak up the sunshine. Around 5 pm, we decided to check out Weeping Rock before heading back to camp. The short 0.3-mile walk took about 20 minutes. The trail up led us to the base of the rock, where we were greeted by some deer friends along the way. It’s worth noting that we visited this area just before the rockfall closure in November 2023.
Dinner at the Campground
Once we got back to camp, we made a fire, cooked up some dinner, and spent the rest of the evening stargazing.
Day 3
〰️
Day 3 〰️
Day 3 Utah National Parks Itinerary:
Exploring Zion


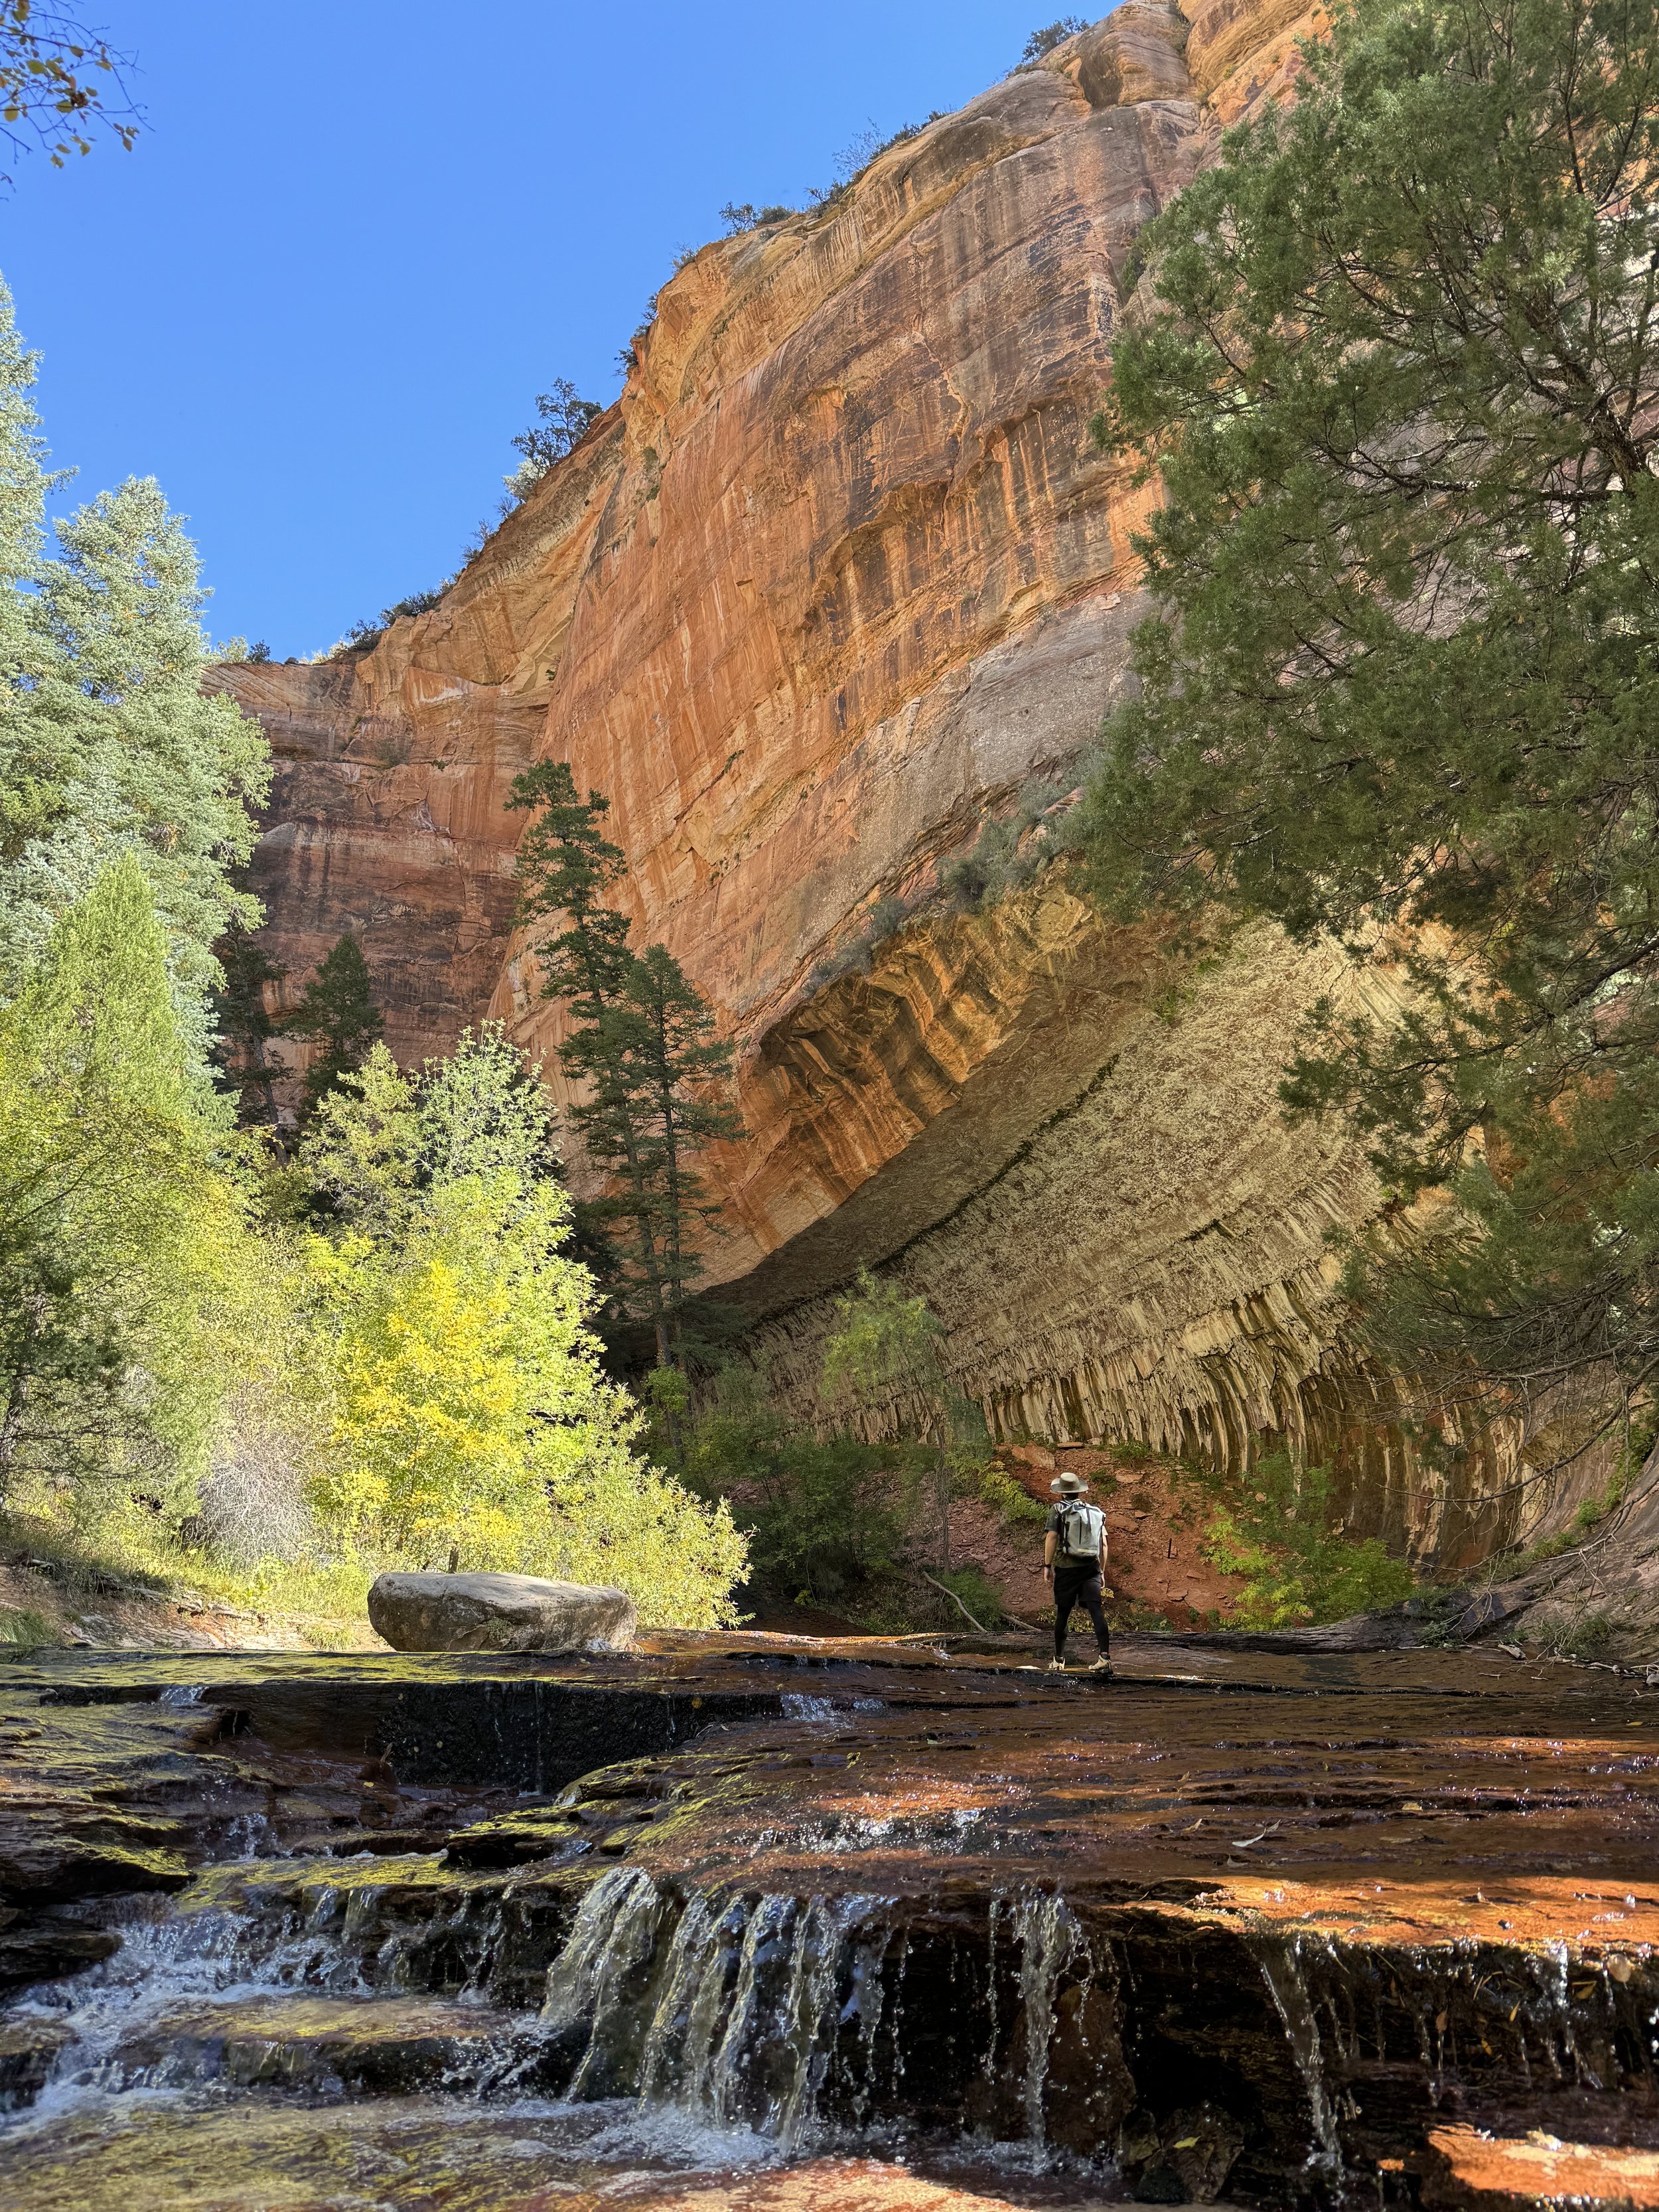


The Subway
We set out for a day on the Left Fork Trail, better known as "The Subway" in Zion National Park, and it was quite an adventure. While AllTrails lists the hike as 7.2 miles, our watches logged closer to 10.3 miles. We were on the trail for about 7 hours and 45 minutes. After an early morning drive—about 35 minutes from our campground—we hit the trailhead at 10am.
Early in the hike, we were so excited that we accidentally detoured into a dried-up riverbed. So if you go, keep a sharp eye on the trail! About 15 minutes in, there’s a steep, rocky descent into the canyon, after which the trail gradually climbs. We were surprised by how forested the route was, offering a stunning display of fall foliage.
The trail is partly defined, but much of it invites you to pick your path along the stream. Expect fun scrambles over rocks, mini waterfalls, and even a bit of wading through water as you approach the carved-out cliff walls near the end. Be sure to look out for dinosaur tracks along the bank—they’re easy to miss, but right alongside the trail. Eventually, you’ll wade through a terraced waterfall and enter the famous tunnel-like passage of the Subway. You might even spot canyoneers emerging from the water where the trail meets their descent.
The hike out was definitely faster, though we were mindful of the setting sun. It took us about 4.5 hours to reach the end point and just 3.5 hours to return, wrapping up the day around 6pm.
Drive to Bryce
We headed northeast towards Bryce, driving along Zion Park Boulevard just as the sun was setting and a sliver moon was rising. While we wished we could have explored more during daylight (something to look forward to on our next trip), we eventually arrived at Bryce’s North Campground (2.5 hour drive from Zion).
Where to stay in Bryce Canyon: North Campground
Pulling in after dark, we tried to find the flattest spot available and eventually settled on Site 098, Loop D for $20/night. On our second day we were warned by a very nice Park Ranger that we shouldn’t technically be in that spot because it was tent only, but they allowed us to stay since we only had one more night left. In case we couldn’t find anything in North Campground, the back-up spots we had noted were dispersed camping in Dixie Forest (Free) or Ruby's RV Park ($50/night).
Day 4
〰️
Day 4 〰️
Day 4 Utah National Parks Itinerary:
Exploring Bryce Canyon


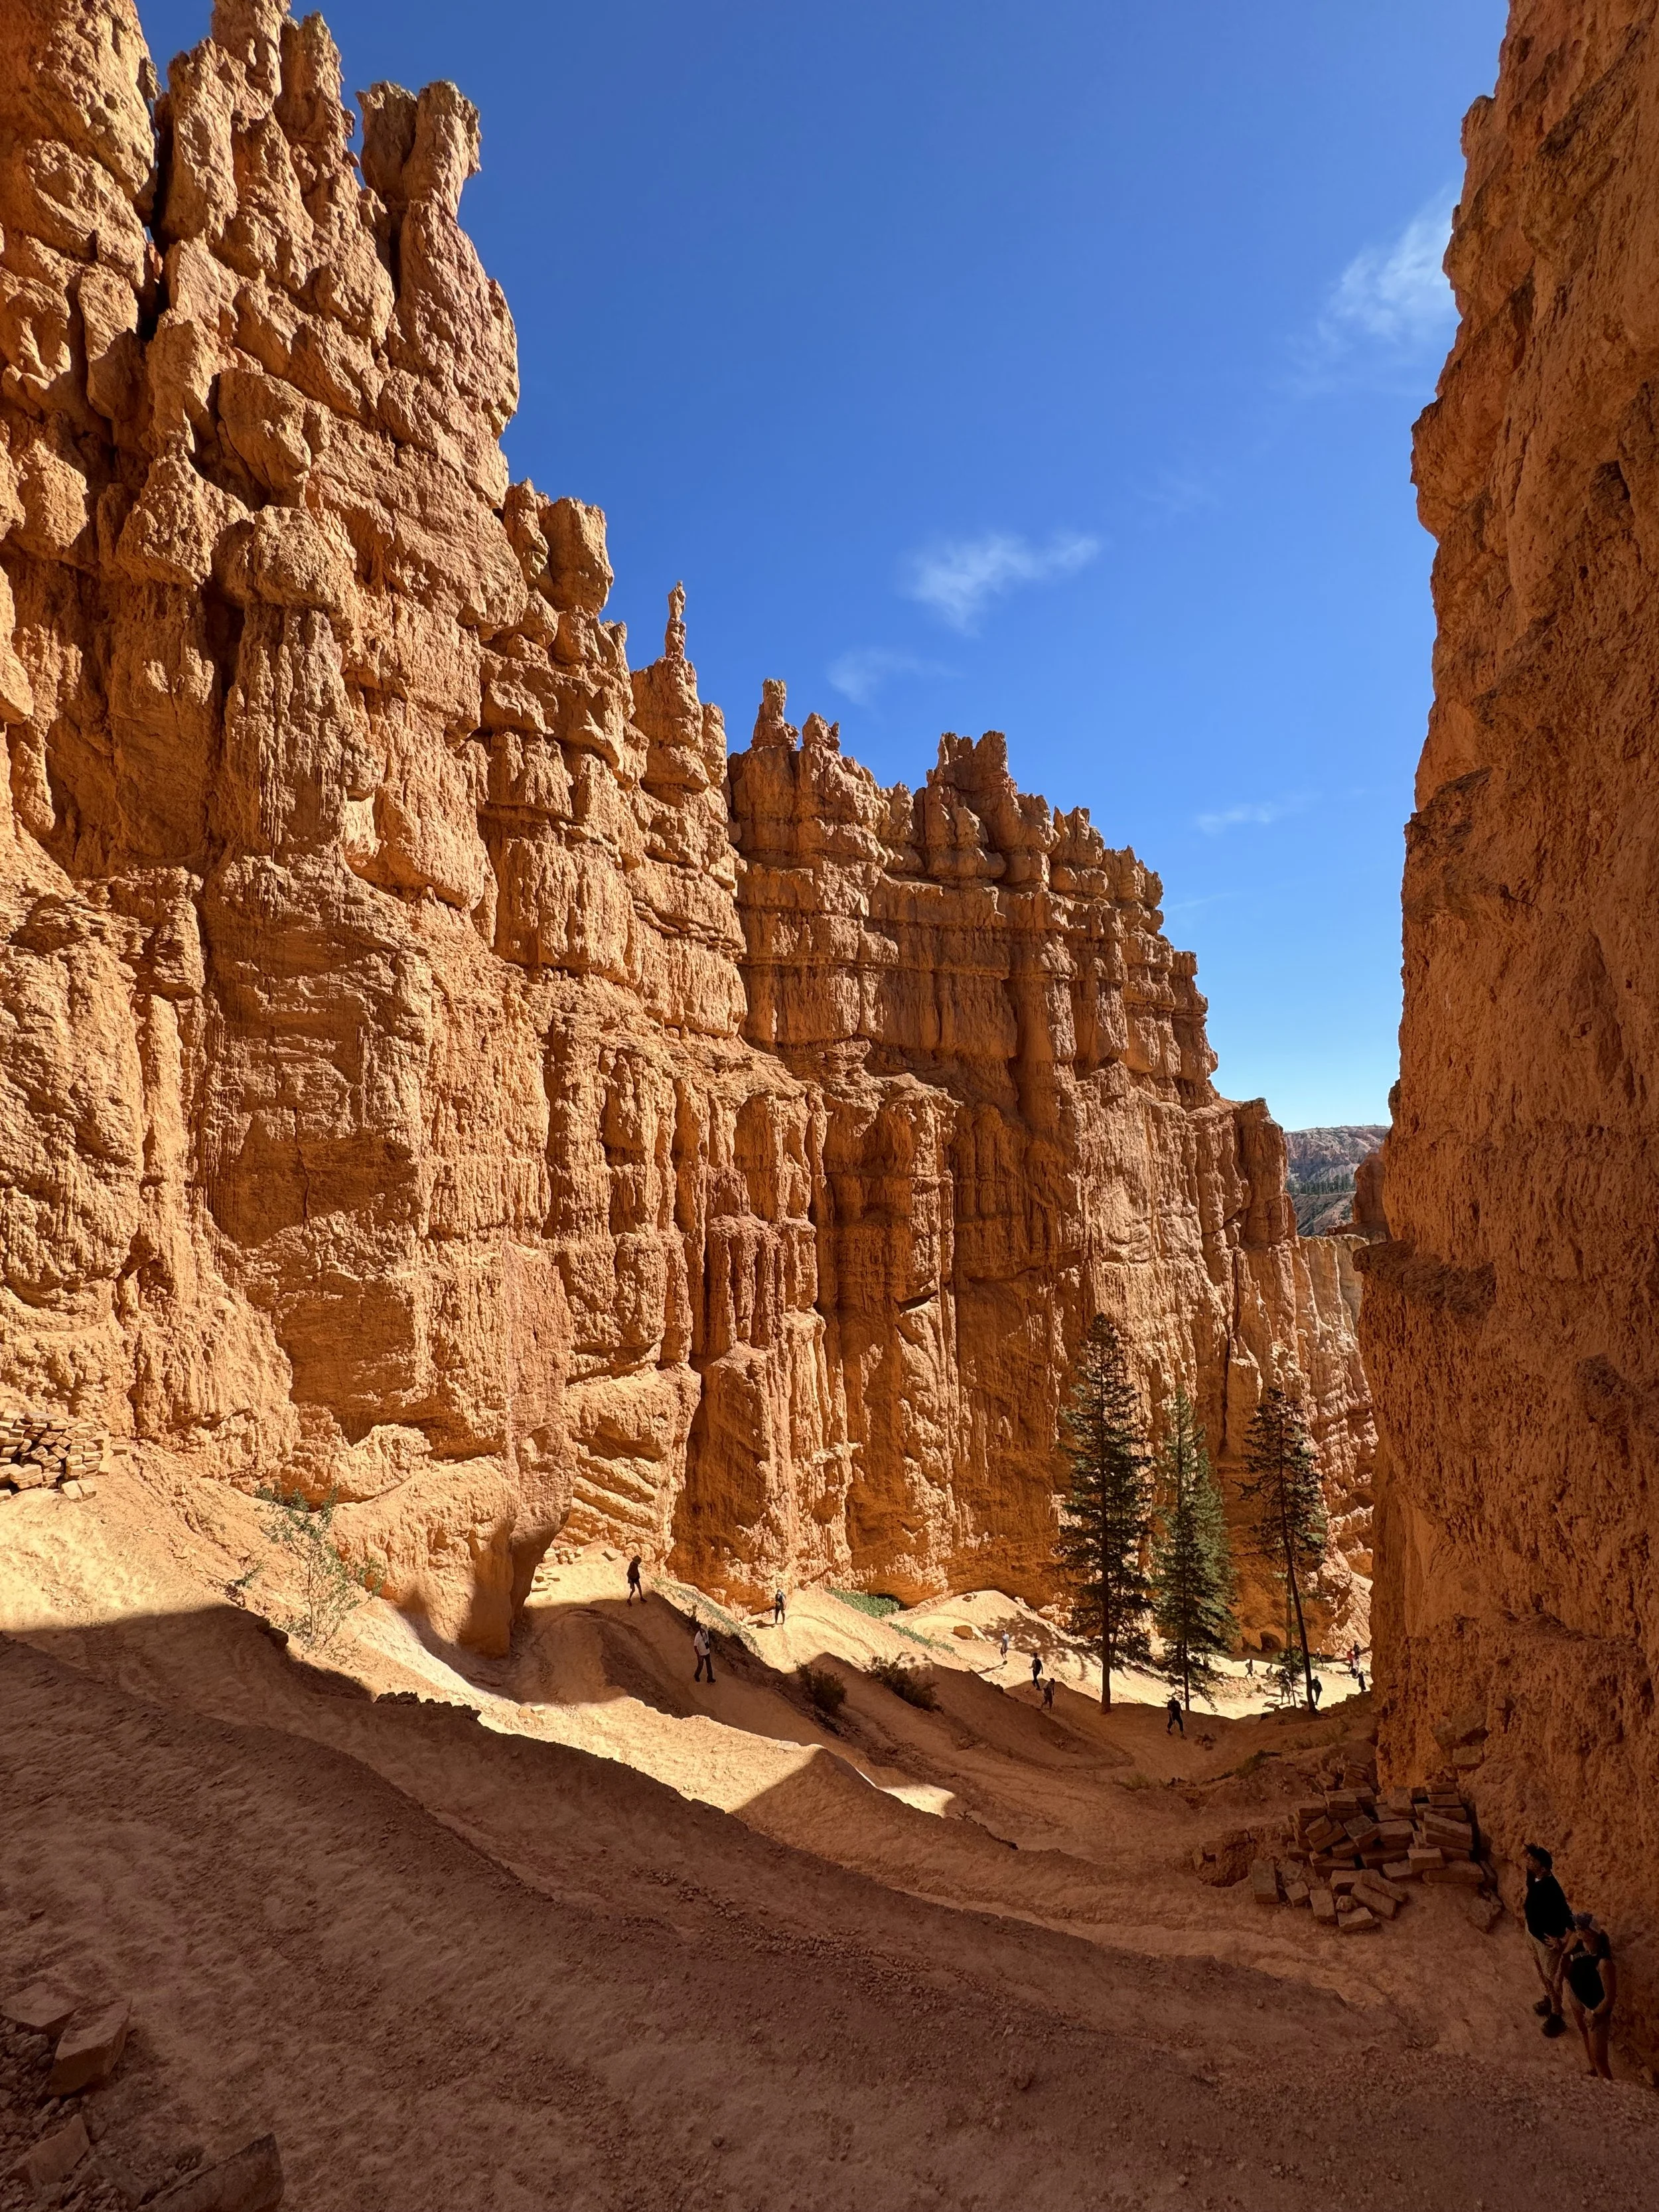


Peekaboo Loop, Navajo Loop and Queens Garden
We hiked a combined figure-eight loop of the Navajo and Peekaboo trails at Bryce Canyon, covering 7.2 miles in about 4 hours and 45 minutes (or 6 hours accounting for photo and snack stops). Starting at Sunset Point around 11:45am, we made it back to the rim by 5:45pm. The busiest areas were around Sunset and Sunrise Points, but once we got half an hour or so into the hike, we enjoyed stretches of trail without any other hikers. As we neared the Peekaboo Loop trailhead, we encountered horse riding tours—an exciting sight, though a bit nerve-wracking as the horses and mules were very close to the edge of the narrow paths.

This day was one of Jenna’s favorites of the trip, thanks to the unbelievable colors, serene landscapes, and perfect weather. Along the way, we passed through little tunnels and were visited by vibrant blue jays. We topped off the day by watching the sunset from the ridge between Sunrise and Sunset Points, where the colors really popped around 6:45pm. In the evening, we spotted some elk on our drive into town for more firewood and settled in for the night with the usual dinner by the campfire.
Day 5
〰️
Day 5 〰️
Day 5 Utah National Parks Itinerary:
Exploring Bryce Canyon


Magic at Sunrise Point
Get your booty up for sunrise!!! The landscape is already otherworldly, but when the morning light hits, it’s overwhelmingly beautiful. We arrived around 7:15 am, and even then, parking was starting to fill up, so we found a spot a little farther out. Instead of joining the crowds at the main viewpoint, we dropped down onto the trail a bit to find a quieter, more secluded spot to take it all in. After the sunrise show, we headed back to our van to cook up breakfast.


Fairyland Loop Trail
The Fairyland Loop Trail, at 8.5 miles, took us about 4 hours and 15 minutes to complete. It was less crowded than the trails we hiked on previous days, but the landscape was just as impressive. The trail is much more exposed, so don’t forget a hat and sunscreen. The views of the hoodoos as you ascend made the hike unforgettable.

Drive to Escalante
After (very reluctantly) leaving Bryce, we drove about 1 hour and 20 minutes to Escalante, arriving just at dusk. The desert skies were painted in soft, cotton candy hues, making for a warm welcome. We paused at Head of the Rocks Overlook to take in the scene before heading off in search of a campsite for the night.
Where to stay in Escalante: BLM dispersed camping
We had our sights set on Calf Creek Campground near Escalante, which is a tucked away, first-come-first-serve spot ($15/night) with only 13 sites. Unfortunately, we arrived just as the last spot was taken, so we had to pivot. Luckily, there’s plenty of nearby BLM land, so we backtracked about 15 minutes and turned down Spencer Flat Road. There, we found a dispersed camping spot for the night (free and scenic), navigating a few potholes along the way. Driving the campervan felt manageable, but we were careful to avoid soft sand areas. After settling in, we cooked dinner—and realized we had a surprise hitchhiker: a little mouse who’d found our stash of honeycrisp apples!
Day 6
〰️
Day 6 〰️
Day 6 Utah National Parks Itinerary:
Exploring Escalante Area


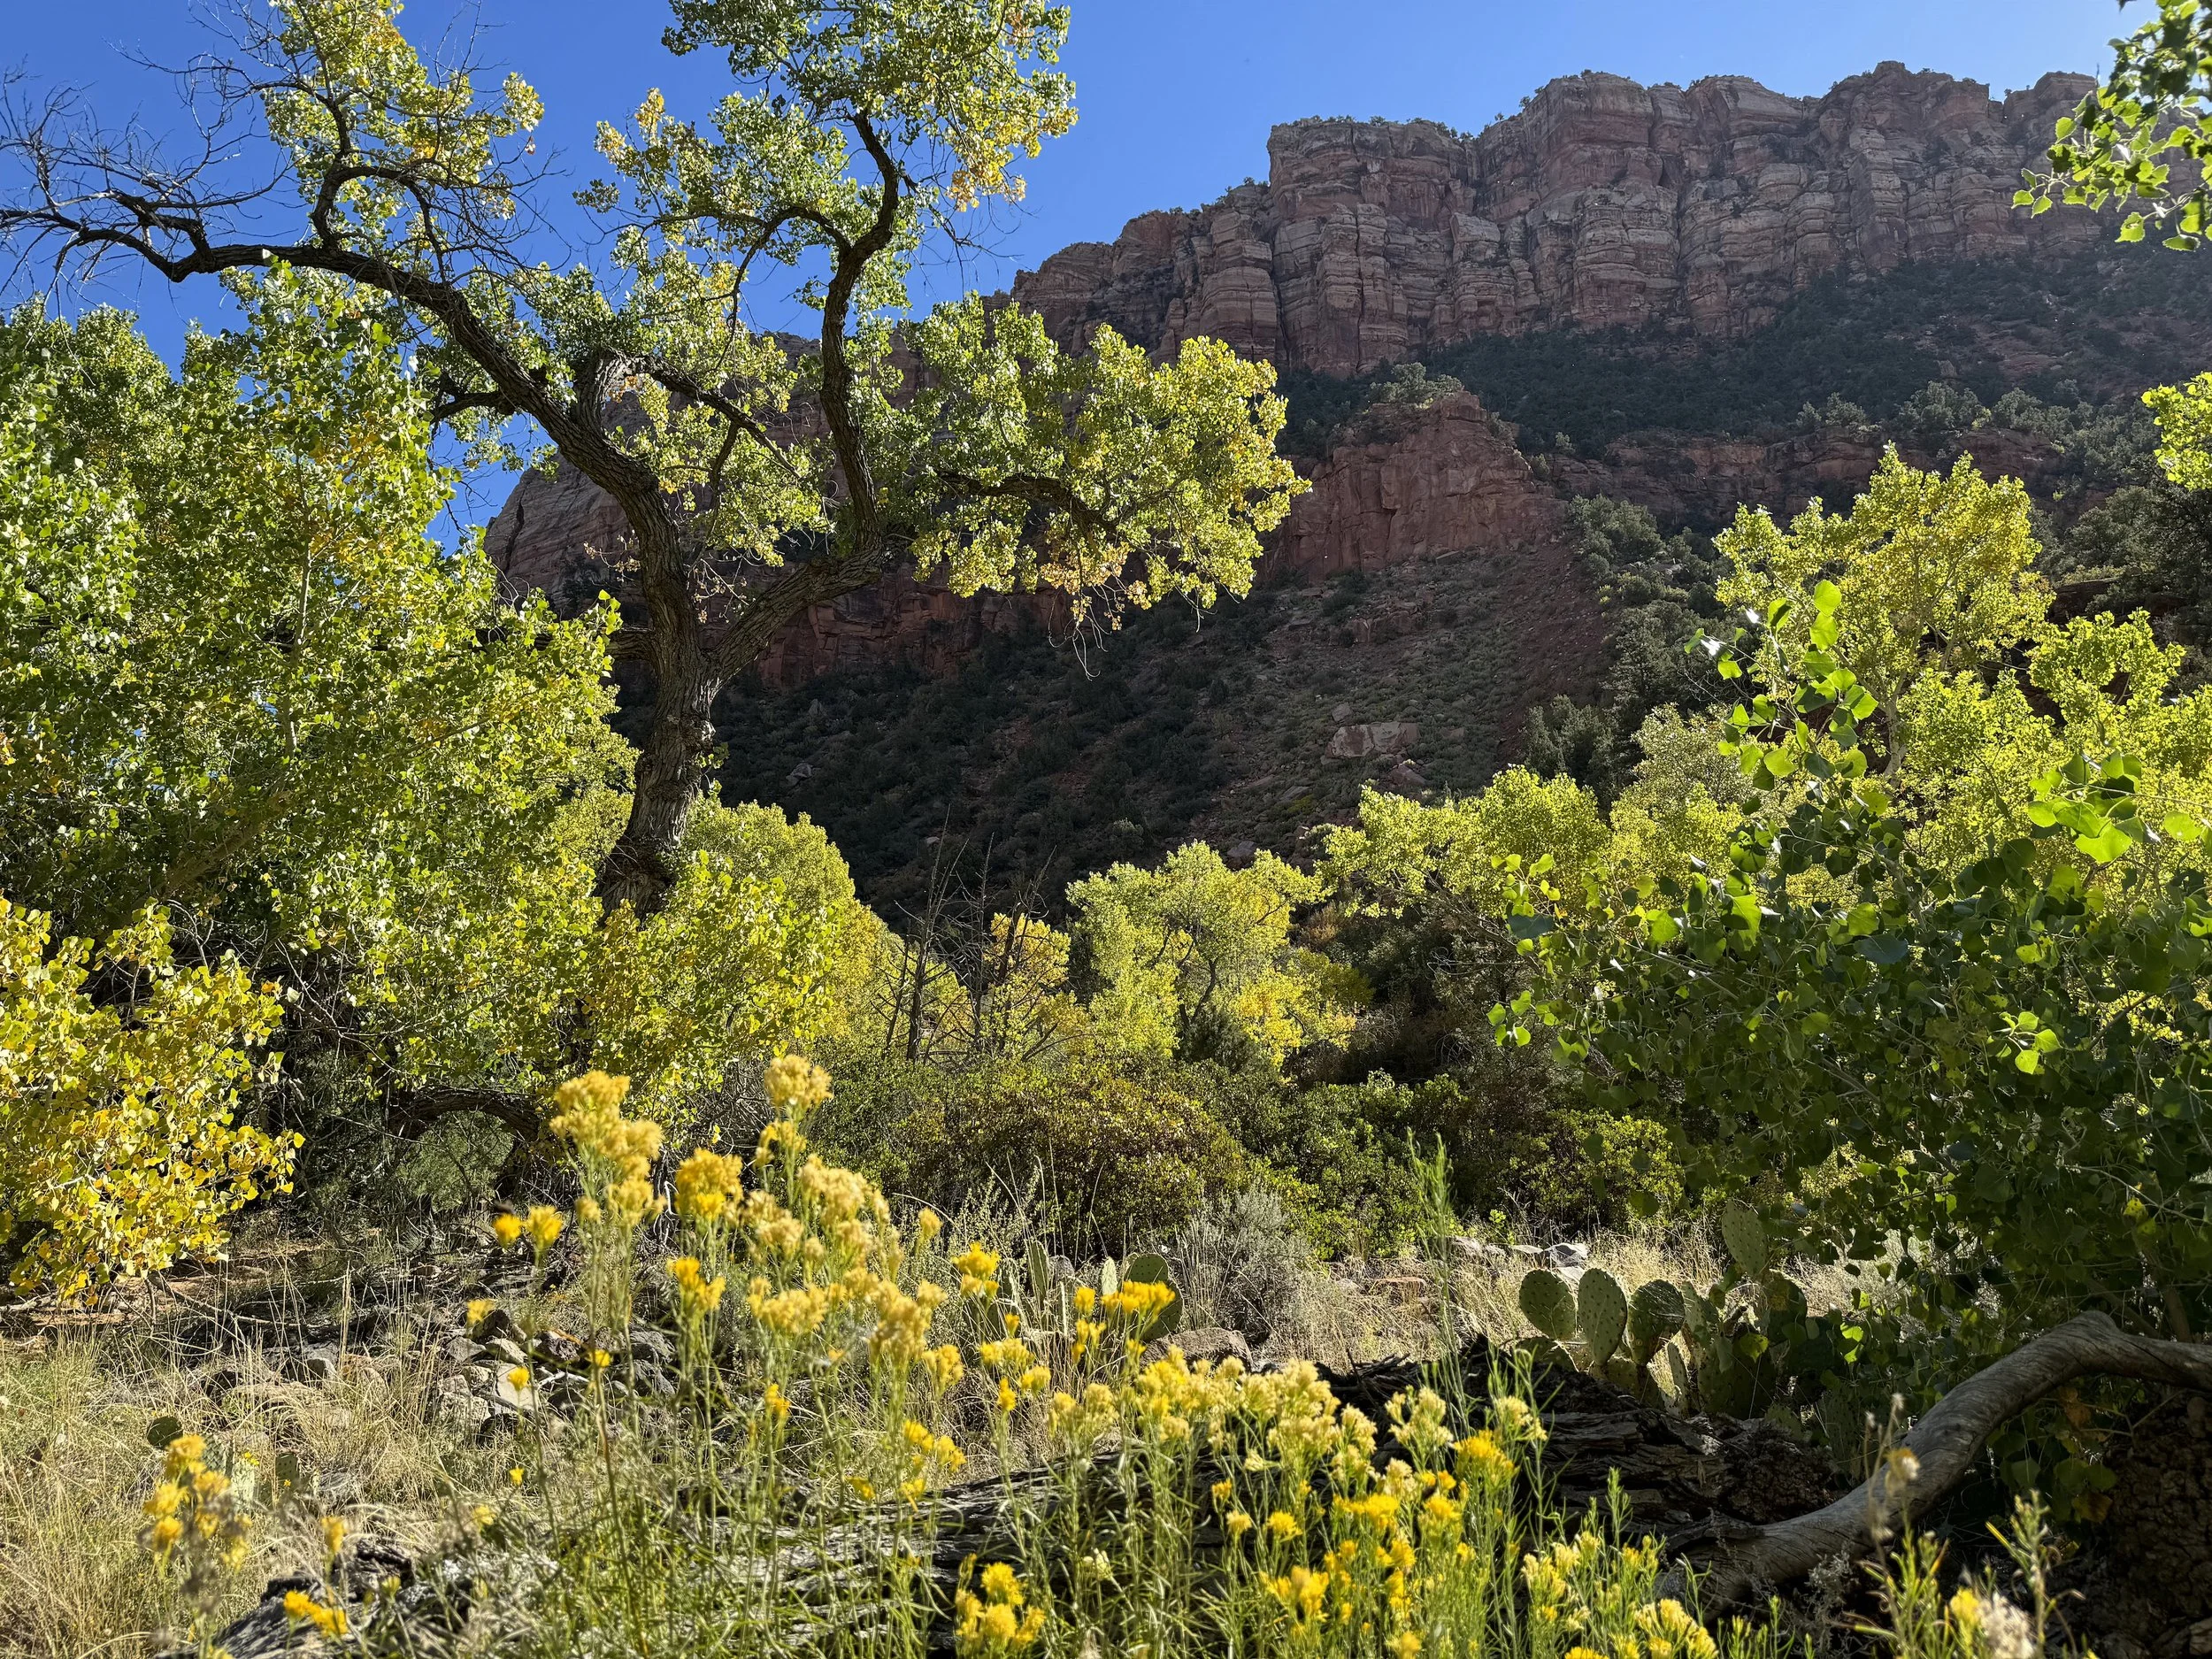
Kiva Koffeehouse
To kick off the day, we stopped by Kiva Koffeehouse, a cute café nestled in the hillside just up the road from Calf Creek, where we enjoyed coffee and pastries while soaking in the sea of yellow leaves ablaze from the morning sunlight. Afterward, we headed to the nearby Petrified Forest to dump and refill the van. The area has a beautiful lake—one we wished we had more time to enjoy.


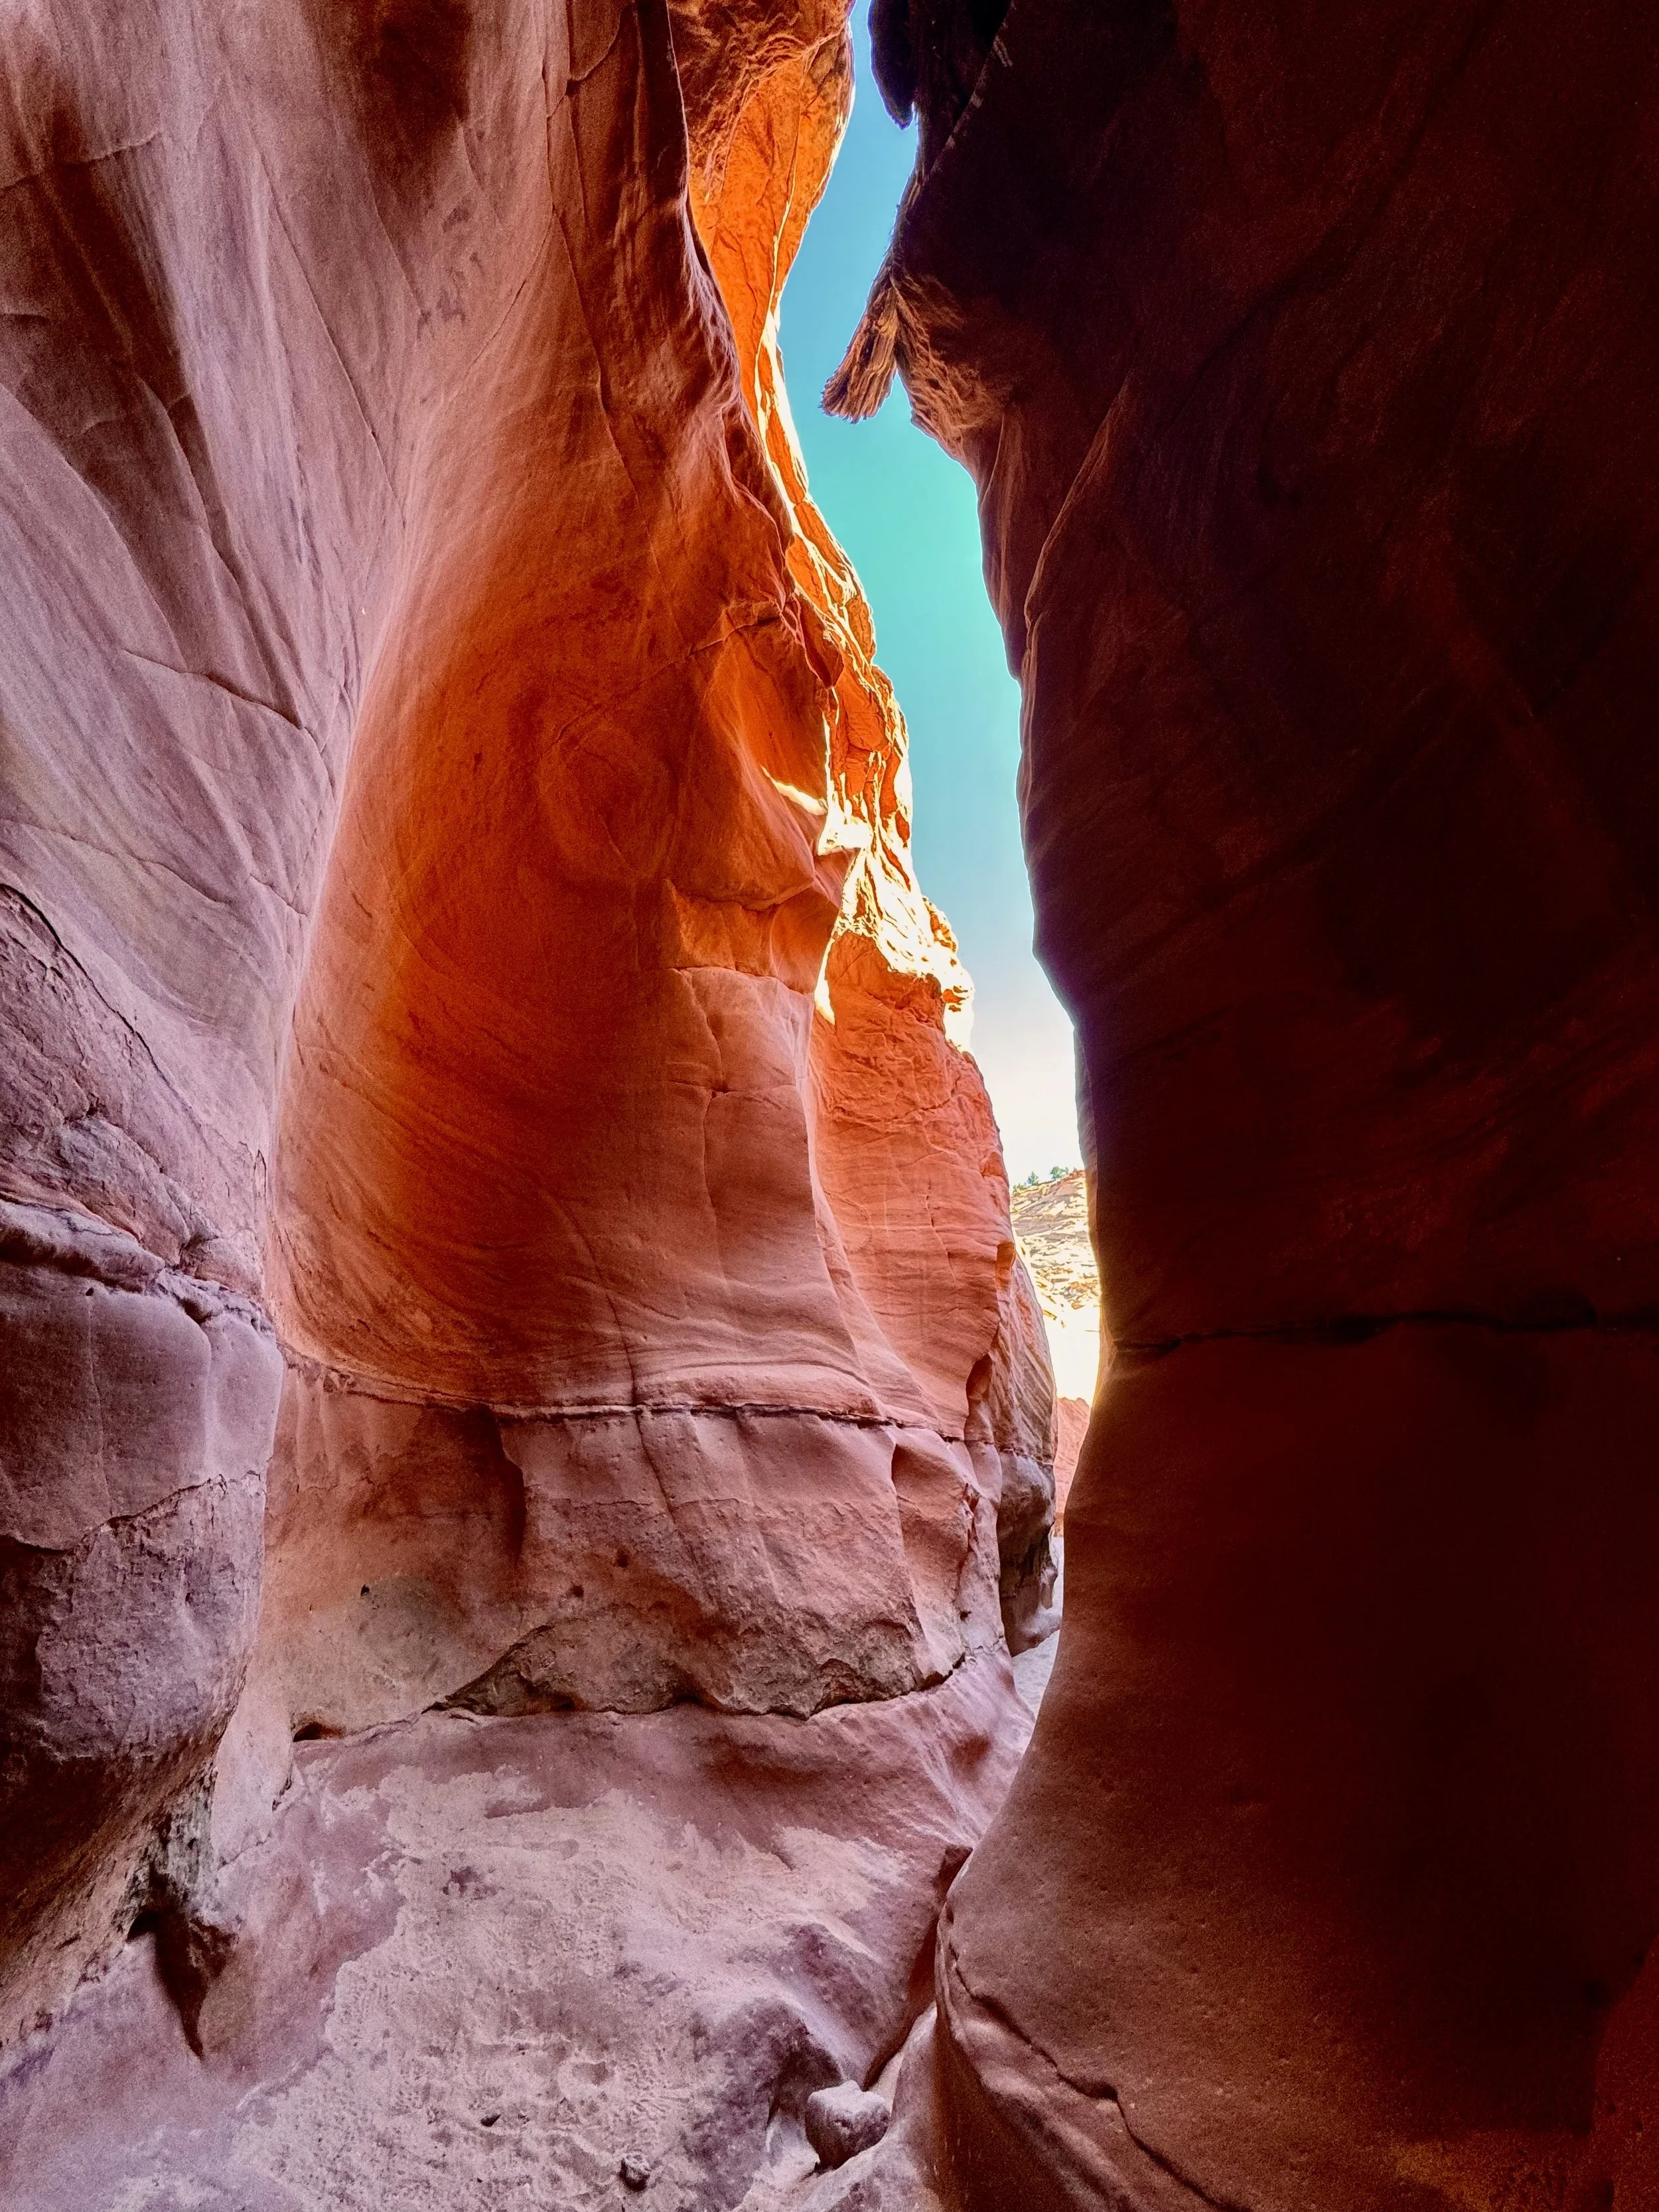

Big Horn Canyon Trail
Our hike along Big Horn Canyon Trail was a fantastic backup plan after realizing the campervan-rattling drive down Hole In The Rock Road to Zebra & Tunnel Trail or even Spooky Slot Canyons wasn’t gonna happen. This 6-mile hike took us about 3 hours and 40 minutes with plenty of stops (as per usual). The trail was very nice, starting with a walk through blooming flowers and brush, before opening into the slot canyons with their intricate layers and shapes. We explored both forks at the end—taking the right fork first, then circling back for the left, where we found a cool, shady spot to eat lunch. Parts of the trail followed a dry creek bed with interesting “swiss cheese” rock walls along the way.
We encountered very few other hikers, making it feel like a hidden gem. The trail isn’t very well marked though, so it’s essential to download a map or use a GPS watch. With minimal shade along the route, we were also grateful for sunscreen, hats, light layers, and plenty of water to keep us cool and safe.


Drive to Capitol Reef
The drive to Capitol Reef along UT-24 E was insane. For nearly two hours, we were treated to veins of yellow foliage winding through the canyons, with aspens in full fall color and pastel skies illuminating the landscape. We stopped at several overlooks to take in the vistas, each one more stunning than the last. Just after dark, we pulled into the campground, ready to explore Capitol Reef the next day.
Where to stay in Capitol Reef: Fruita Campground
For our stay in Capitol Reef, we booked a spot at Fruita Campground—Site 004 (out of 65) for $20 a night. It’s a nice location, right across from the host area, with easy access to bathrooms, water, and a view of the horse pasture and surrounding cliffs. A bright yellow tree nearby added a splash of color to our campsite. After settling in, we built a fire and enjoyed some more stargazing. This campground felt a bit more open and busy compared to others we visited, but it was still a beautiful and convenient place to stay. No backups needed since we had a reservation.
Day 7
〰️
Day 7 〰️
Day 7 Utah National Parks Itinerary:
Exploring Capitol Reef


Scenic Drive and Capitol Gorge Road
We started our day with an inviting view of the horse pasture at Fruita Campground, where we spotted some deer grazing nearby. After topping off our water supply at the campground facilities, we set out for the scenic drive through Capitol Reef National Park. The drive was of course wonderful in and of itself, but we highly recommend continuing down Capitol Gorge Road to enhance the experience. Along the gorge, we couldn’t resist pulling over to climb some of the “swiss cheese” rock walls and play around a bit.


Cassidy Arch Trail
We wrapped up our short time in Capitol Reef with a hike to Cassidy Arch, a 3.1-mile trek that took about 1.5 hours. It was one of the busier trails we did on our trip, but we’d still recommend it. After finding a parking spot just outside the main lot, we set out along the trail, which hugs the cliffside and offers sweeping vistas the entire way. At the arch itself, there were plenty of fun spots to scramble and spread out. A group of rappellers descending the arch provided some entertainment for all the hikers, too.
Drive back to Vegas
To cap off the Utah adventures, we had an uneventful but beautiful 5.5 hour drive back to Vegas for a music festival the next day!
We had such high expectations for this trip—and these parks delivered. We can’t wait to go back and explore more of all Utah has to offer.
Affiliate disclaimer
Some of the links on this site are affiliate links. This means that if you click on the link and make a purchase, we may receive a small commission at no extra cost to you. These commissions help support the content we create and maintain this website.
We only recommend products or services that we have personally used, believe in, or think will add value to our audience. Your support through these links is greatly appreciated!